This is an advanced tutorial and is not supported by Media Wizard Studios. Knowledge of HTML and CSS is required.
Uploading your font
To get started, you will first need to upload the font into the Assets folder of your theme.
To get to the Assets folder of your theme, navigate to your Shopify dashboard. From here, go to: Online Store > Actions > Edit Code
Scroll down till you find the Assets folder and click add a new asset, select your font file and hit upload asset.
Installing your font in your theme
Next up: telling your theme that it can use the font file that you have uploaded.
Go to your theme’s main CSS file (usually named styles.scss.liquid, theme.scss.liquid, or another variation of this). This file can be found in the Assets folder of your theme – navigate to the bottom of this file to add new code into your theme.
Add the code below, replacing highlighted elements of the code with actual data. Font name > the name of the font, if the font has more than one word in it’s name it will need “quotation marks” – these will also be needed when inserting into Shogun. Filename > the name of the file that was just uploaded to your theme including the file extension, for example, cosmic_sans_bold.ttf. Format > the format of the font that was uploaded, for example, for Athena.ttf this would be “TrueType”.
If you use a free theme from Shopify, then you might be able to reach out to Shopify’s Support team for basic technical assistance with this tutorial.
If you need more advanced customization but don’t have experience developing websites with HTML, CSS, and JavaScript, then consider hiring a Shopify Expert.
If you sell clothing items that require customers to know their size before they make a purchase, you can add a custom size chart to your product page.
All products that require reference to the size chart must have a Size option:
Caution
This tutorial doesn’t work for Narrative or the non-sectioned version of Brooklyn. If you use non-sectioned Brooklyn, then you can follow this customization guide that isn’t supported by Shopify.
Additionally, size chart tables are not responsive to all devices. They can be cut off the side of the page on mobile devices if too many columns of information are added.
Sectioned and non-sectioned themes
Note
The steps for this tutorial differ depending on whether you are using a sectioned or a non-sectioned theme. A sectioned theme is a newer theme that lets you drag and drop to arrange the layout of your store’s pages.
To figure out whether your theme supports sections, go to the theme’s Edit code page. If there are files in the Sections directory, you are using a sectioned theme. Non-sectioned themes were released before October 2016, and do not have files in the Sections directory.
If you are using a sectioned theme, click the Sectioned themes button and follow the instructions. If you are using an older, non-sectioned theme, click the Non-sectioned themes button and follow the instructions.
In the Content box, create a table that contains your size chart information. Customize the table to look the way you want it to:
In the Visibility section, make sure the page is set to Visible.
Click Save.
Adding the size chart to your theme
Desktop
iPhone
Android
From your Shopify admin, go to Online Store > Themes.
Find the theme you want to edit, and then click Actions > Edit code.
In the Sections directory, click to open your product-template.liquid file.
Add a Size chart button by pasting the following code above the Add to cart button:Copy{% if product.options contains 'Size' %} <a class="btn size-chart-open-popup" href="#size-chart">See size chart</a> {% endif %}
Add the following code to the bottom of the product-template.liquid file:Copy<div id="size-chart" class="mfp-hide"> {{ pages.size-chart.content }} </div> <style> #size-chart { border: 2px #555 solid; background-color: #ffffff; padding: 20px; max-width: 800px; margin-left: auto; margin-right: auto; } </style>
Click Save.
In the Assets directory, click theme.js. Add the following code to the bottom of the file:Copy$('.size-chart-open-popup').magnificPopup({ type:'inline', midClick: true });
Click Save.
Tip
If the size chart isn’t appearing, you might need to add extra code to your theme. Because Magnific Popup is required for this customization to work, some themes, such as Debut, require that you complete the following steps.
In the Assets directory, click to open your theme.scss.liquid file, or your timber.scss.liquid file, and add this css to the bottom.
Do one of the following:
If your theme has a vendor.js file in the Assets directory, open the file and add this code to the bottom.
If your theme does not have a vendor.js file in the Assets directory, place this code just above the $('.size-chart-open-popup').magnificPopup code in your theme.js file.
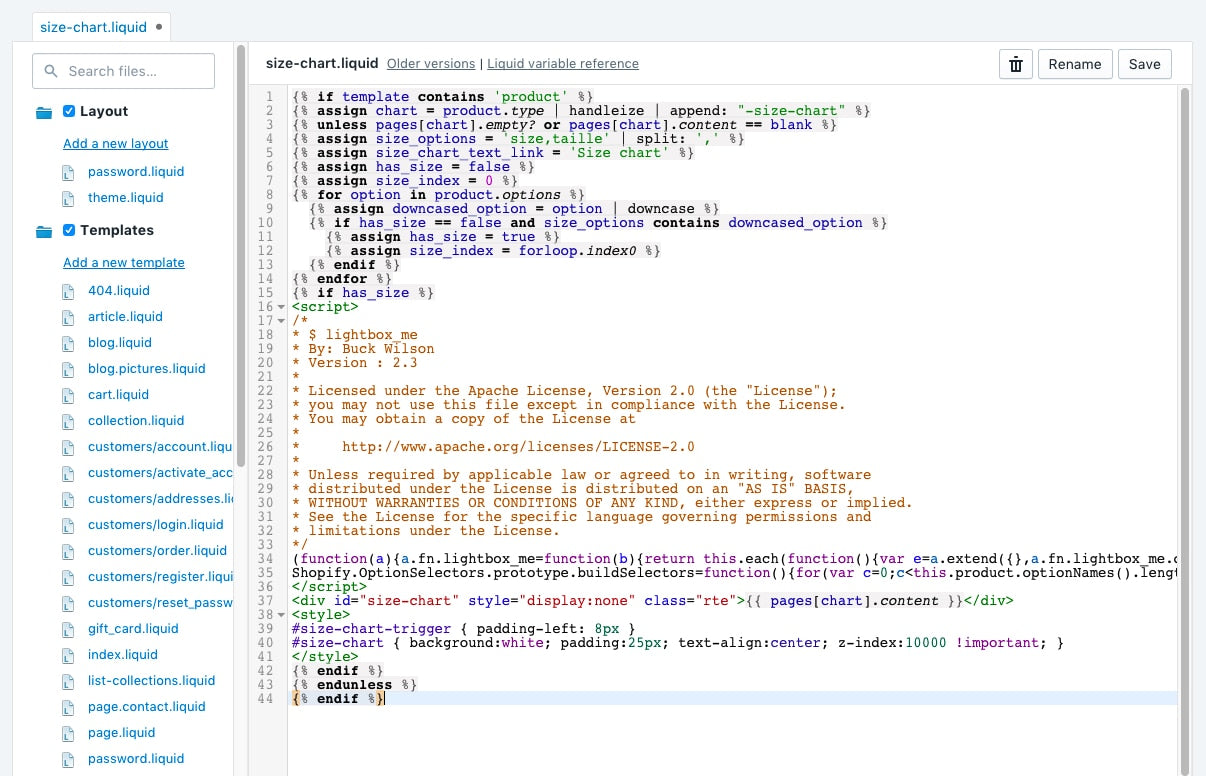
Return to your new size-chart.liquid snippet, and paste the code into the file:
Click Save.
In the Layout directory, click theme.liquid.
Find the closing </body> tag. Right before the closing </body> tag, paste the following code:Copy{% render 'size-chart' %}
Click Save.
Setting up a size chart specific to a vendor or product type
If you selected a size chart specific to a vendor or product type, you will need to make a size chart for each vendor or product type. The process is the same as making a chart for the whole shop, except you need to put the vendor or product type at the beginning of the size chart page title and handle. For example, if you have a vendor called Great Owls, your size chart page would be named Great Owls Size Chart, and the handle of the page would be great-owls-size-chart:
If your size chart is for a product type, you might have a chart for product type shoes. You would then call your size chart page Shoes Size Chart, and the handle would be shoes-size-chart .
Using a different language or changing the ‘Size chart’ text
If your store’s operating language is not English, or you want to use different text than ‘Size chart’ on your product page, you can make these changes in your size chart snippet.
Desktop
iPhone
Android
From your Shopify admin, go to Online Store > Themes.
Find the theme you want to edit, and then click Actions > Edit code.
In the Snippets directory, click size-chart.liquid.
Edit the size_options values to match the translation you have for your product option. Separate each option value with a comma.For example, to add a German translation, you might change the code to:{% assign size_options = 'size,taille,Größe' | split: ',' %}
Although Shopify can generate templates, you’re responsible for following your published policies. Review your policies carefully before adding them.
Note
Templates for your store policies are available only in English. If you operate your store in another language, then you need to create your own store policies. Contact a local law expert for help.
Enter your store policies, or click Create from template to enter the default template. Use the rich text editor to add style and formatting to your policies, and to add links and images.
Review your policies and make any changes.
Click Save to add your policies.
When you add your store policies, they are automatically linked in the footer of your checkout pages. Customers might need to see your policies before they check out, so it’s a good idea to link those pages in your store navigation.
You can create webpages in your Shopify admin. Webpages are useful for publishing information that rarely changes or that customers reference often, like a “About us” page or a “Contact us” page.
If you use a free theme from Shopify that was downloaded after November 2018 and you’ve added your shipping policies, then the product pages on your online store include a link to your shipping policies. This is to communicate any additional costs associated with the product, or shipping conditions.
You can remove this link by editing your theme’s language.
Steps:
Go to Online store > Themes.
Beside your current theme, click Actions > Edit languages.
In the search box, type shipping policy html.
In the Shipping policy html box, replace the contents with a single space.
Click Save.
Add policies to your store menus
By default, links to your policies are listed in your checkout footer. A link to your refund policy is also listed on your order review page. A link to your shipping policy is listed on your product pages and your cart.
You can update your menus to include these policies.
Go to Online Store > Navigation.
Click the name of the menu where you want to add the policy.
Add the policies that you want to the menu:
Click Add menu item.
Enter a name for the policy’s menu item, and then search for your policy.
Click Add.
Click Save menu.
Add links to your policies within pages or on social media
You can add direct links to your policies by adding the following to the end of your store’s domain name:
Refund policy: /policies/refund-policy
Privacy policy: /policies/privacy-policy
Terms of service: /policies/terms-of-service
Shipping policy: /policies/shipping-policy
For example, if your domain name was johns-apparel.myshopify.com, then a direct link to your shipping policy would be johns-apparel.myshopify.com/policies/shipping-policy.
Add a COVID-19 prevention policy
You can inform your customers about the changes that you’re making to your store’s policies during the COVID-19 pandemic. This can help customers feel reassured that their shipments are being handled in a clean environment, and that precautions are being taken to ensure their safety. You can use any or all of the following options.
Add a prevention policy as a page on your site
You can create a specific COVID-19 prevention policy page and add it to a menu, such as your main menu or footer menu, on your website.
Steps:
From your Shopify admin, go to Online Store > Pages.
Click Add page.
Enter the title and the page contents.
Click Save.
Go to Online Store > Navigation.
Click the name of the menu where you want to add the page.
Click Add menu item.
Enter a name for the page’s menu item, and then search for your new page.
Click Add.
Click Save menu.
Update your store policies
You can add virus or disease prevention clauses to your store policies. For example, consider updating your shipping policy to include the following information:
How your store handles shipping delays caused by viral prevention measures, such as countries closing their borders or not accepting international shipments.
Shipping sanitation measures your store takes during viral outbreaks.
Any changes to your return shipping policies during viral outbreaks.
Steps:
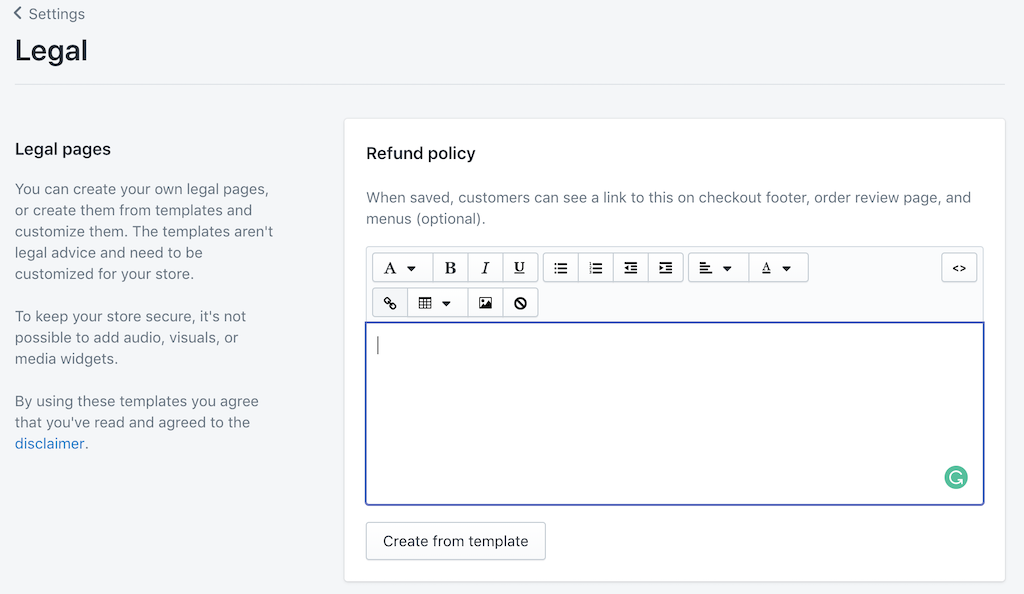
From your Shopify admin, go to Settings > Legal.
Optional: If you don’t have a Refund policy, Privacy policy, or Terms of service, then you can click Create from template to use a default template.
Update your policies.
Click Save.
Create a blog post
A blog post can be a great way to explain how your store is addressing COVID-19 concerns using a less formal tone than you’d use in your legal policies.
Blog posts are hidden by default and don’t appear on your online store unless you set them to be visible.
Steps:
From your Shopify admin, go to Online Store > Blog Posts.
Click Add blog post.
Enter a title.
Enter the blog post content. This field uses the rich text editor, so you can format your post content. You can also add images, embed videos or other media, or insert links.
Choose the settings for your blog post:
Author: From the drop-down menu, select the name of the person writing the post. Only the names of the store owner and staff members appear in the drop-down menu.
Blog: Select the name of the blog where the post will be published. If you don’t want to publish to one of your existing blogs, then you can create a new blog in the drop-down menu.
Optional: Display an image on the blog landing page. Click Upload image in the Featured image section, and then select an image to upload.
Optional: Include an excerpt from your blog post on the blog landing page.
Optional: Add tags to your blog posts to organize them by category or subject. Customers can click tags to find other blog posts in the same category. When a customer searches for a tag in your online store, matching blog posts will appear in the search results. Enter tags, separated by commas, in the Tags field.
Optional: If you have created a custom template for blog posts, then you can select a template. In the Template drop-down menu, select the template that you want to use for the post.
Optional: Edit the search engine listing for your blog post in the Search engine listing preview section.
Optional: Make your blog post visible. Select Visible in the Visibility section, or set a specific publishing date for the post. You can edit or delete a published blog post at any time.