Click Sign in (at top right), and select Analytics.
If you are already signed in to Google (e.g. you are signed in to your Gmail account), you’ll be taken directly to the Analytics user interface. Otherwise, you will be prompted to enter your Google account (e.g. Gmail account) and password. Once you have signed in to Analytics, you can open the account search at the top of any Analytics page to see the accounts, properties, and views to which you have access.
If you’ve linked Analytics to a Google Ads account, you can access your Analytics views and reports at any time by clicking Tools > Measurement in your Google Ads account. Use the menu on the tab to select Analytics.
Set up a reporting view in your property. Views let you create filtered perspectives of your data; for example, all data except from your company’s internal IP addresses, or all data associated with a specific sales region.
Follow the instructions to add the tracking code to your websiteso you can collect data in your Analytics property.
Link your Google Ads and Analytics accounts so you can share data between them and develop a more comprehensive understanding of how your marketing efforts drive user behavior on your sites or apps. Learn more about linking your accounts.
Set up reporting views so you can align Analytics users and relevant data. Learn more about views.
Set up goals to identify the actions you want users to take on your site or app, and to give a monetary value to those actions. Learn more about setting up goals.
Modify your tracking code to collect additional data such as:
User interactions with links, buttons, video controls, and other dynamic elements of your site or app. Learn more about event tracking.
Ecommerce activity like user engagement with product lists and internal promotions, and how successfully users moved through your purchase funnel and checkout process. Learn more about ecommerce and enhanced-ecommerce data collection and reporting.
Download the Analytics app
Once you have installed the tracking code on your site or app, and have configured your Analytics account, download the Analytics app from Google Play so you can take Analytics reporting with you anywhere (well, anywhere you have a connection).
Note: Facebook page cover templates come sized at double the recommendation (1640 x 924) to help prevent any chance of a cover photo travesty.
Instagram image sizes
Social media image type
Dimensions in pixels
Instagram Ad / Carousel Ad
1080 x 1080
Instagram Post
1080 x 1080
Instagram Profile Photo
360 x 360
Instagram Landscape Photo
1080 X 566
Instagram Portrait
1080 x 1350
Instagram Story
1080 x 1920
IGTV Cover Photo
420 x 654
Note: Similar to Facebook covers, Instagram profile picture templates are sized higher to help prevent your image from becoming distorted when uploaded to Instagram. Just make sure to center the focus of your image in order to account for the circle cropping.
Twitter image sizes
Social media image type
Dimensions in pixels
Twitter Header Photo
1500 x 500
Twitter Profile pic
400 x 400
Twitter Lead Generation Card
800 x 320
Twitter Post
1024 x 512
LinkedIn image sizes
Social media image type
Dimensions in pixels
LinkedIn Company Cover
1128 x 191
LinkedIn Cover Photo
1584 x 396
LinkedIn Profile
400 x 400
LinkedIn Post
1400 x 800
LinkedIn Sponsored Ad
1200 x 627
Pinterest Pin sizes
Social media image type
Dimensions in pixels
Static Pin
1000 x 1500
Ad Pin
1000 x 1500
Video Pin
1000 x 1500
Carousel Pin
1000 x 1500 or 1000 x 1000
Carousel Ad Pin
1000 x 1500 or 1000 x 1000
Shopping Ad Pin
1000 x 1500
Collection Pin
1000 x 1500
Idea Pin
1080 x 1920
YouTube image sizes
Social media image type
Dimensions in pixels
YouTube Banner / Channel Art
2560 x 1440
YouTube Thumbnail
1280 x 720
YouTube Channel icon
800 x 800
YouTube Intro
1920 x 1080
YouTube Outro
1920 x 1080
YouTube Display Ad
300 x 250
YouTube Display Ad Long
300 x 60
YouTube Overlay Ad
480 x 70
Snapchat image sizes
Social media image type
Dimensions in pixels
Snapchat Filter
1080 x 2340 (PNG < 300 KB)
Snapchat Story Ad
360 x 600
Snapchat Ad
1080 x 1920
Etsy image sizes
Social media image type
Dimensions in pixels
Etsy Shop Big Banner
3360 x 840
Etsy Shop Mini Banner
1200 x 160
Etsy Profile Photo
500 x 500
Etsy Order Receipt Banner
760 x 100
Etsy Shop Icon
500 x 500
Etsy Item Listing Photo
min 2000 on short edge
Additional banner sizes (collage banner, carousel banner) are available to Etsy Plus users. Please see here for more details.
Twitch image sizes
Social media image type
Dimensions in pixels
Twitch Highlights
1920 x 1080
Google My Business Image Sizes
Social media image type
Dimensions in pixels
Google My Business Post Image Size
400 x 300 Minimum // 800 x 600 // (4:3 Ratio) Default Size – 720 x 540 pixels Maximum Size – 2120 x 1192 pixels Minimum Size – 480 x 270 pixels Aspect Ratio – 4:3
Having issues with page role requests on your company Facebook page? Don’t worry, you’re not alone. Unfortunately this happens pretty often, but there’s usually a way to get around it.
If you’re trying to get someone to add you to a Facebook page:
First, you need to LIKE the page to which you’re trying to be added as a user.
If someone sends you an page role request and you don’t see the request as a notification when you login to Facebook, follow this link: https://www.facebook.com/pages/?category=invites and you should be able to see and accept the request there.
If you still can’t see the request, you should wait an hour or so and then log out of Facebook and log back in.
If you’re trying to add someone to your Facebook page:
If you’re already a user on the Facebook page, but are trying to add another user, here’s what you need to do (if you are NOT an Administrator on the page, then you need to have an Administrator complete the following steps):
Login to your personal Facebook and go to the Business page.
Click Settings at the top right of the Page.
In the left column, find and click Page Roles.
Under Assign a New Page Role, type a name or email in the box and select the correct person from the list that appears.
Click Editor to select a role from the drop-down menu, and then select Admin.
Click Add and enter your password to confirm.
If the person you’re trying to add doesn’t show up in the drop-down list, then you need to make sure the person has LIKED the page you’re trying to add him to.
This is an advanced tutorial and is not supported by Media Wizard Studios. Knowledge of HTML and CSS is required.
Uploading your font
To get started, you will first need to upload the font into the Assets folder of your theme.
To get to the Assets folder of your theme, navigate to your Shopify dashboard. From here, go to: Online Store > Actions > Edit Code
Scroll down till you find the Assets folder and click add a new asset, select your font file and hit upload asset.
Installing your font in your theme
Next up: telling your theme that it can use the font file that you have uploaded.
Go to your theme’s main CSS file (usually named styles.scss.liquid, theme.scss.liquid, or another variation of this). This file can be found in the Assets folder of your theme – navigate to the bottom of this file to add new code into your theme.
Add the code below, replacing highlighted elements of the code with actual data. Font name > the name of the font, if the font has more than one word in it’s name it will need “quotation marks” – these will also be needed when inserting into Shogun. Filename > the name of the file that was just uploaded to your theme including the file extension, for example, cosmic_sans_bold.ttf. Format > the format of the font that was uploaded, for example, for Athena.ttf this would be “TrueType”.
If you use a free theme from Shopify, then you might be able to reach out to Shopify’s Support team for basic technical assistance with this tutorial.
If you need more advanced customization but don’t have experience developing websites with HTML, CSS, and JavaScript, then consider hiring a Shopify Expert.
If you sell clothing items that require customers to know their size before they make a purchase, you can add a custom size chart to your product page.
All products that require reference to the size chart must have a Size option:
Caution
This tutorial doesn’t work for Narrative or the non-sectioned version of Brooklyn. If you use non-sectioned Brooklyn, then you can follow this customization guide that isn’t supported by Shopify.
Additionally, size chart tables are not responsive to all devices. They can be cut off the side of the page on mobile devices if too many columns of information are added.
Sectioned and non-sectioned themes
Note
The steps for this tutorial differ depending on whether you are using a sectioned or a non-sectioned theme. A sectioned theme is a newer theme that lets you drag and drop to arrange the layout of your store’s pages.
To figure out whether your theme supports sections, go to the theme’s Edit code page. If there are files in the Sections directory, you are using a sectioned theme. Non-sectioned themes were released before October 2016, and do not have files in the Sections directory.
If you are using a sectioned theme, click the Sectioned themes button and follow the instructions. If you are using an older, non-sectioned theme, click the Non-sectioned themes button and follow the instructions.
In the Content box, create a table that contains your size chart information. Customize the table to look the way you want it to:
In the Visibility section, make sure the page is set to Visible.
Click Save.
Adding the size chart to your theme
Desktop
iPhone
Android
From your Shopify admin, go to Online Store > Themes.
Find the theme you want to edit, and then click Actions > Edit code.
In the Sections directory, click to open your product-template.liquid file.
Add a Size chart button by pasting the following code above the Add to cart button:Copy{% if product.options contains 'Size' %} <a class="btn size-chart-open-popup" href="#size-chart">See size chart</a> {% endif %}
Add the following code to the bottom of the product-template.liquid file:Copy<div id="size-chart" class="mfp-hide"> {{ pages.size-chart.content }} </div> <style> #size-chart { border: 2px #555 solid; background-color: #ffffff; padding: 20px; max-width: 800px; margin-left: auto; margin-right: auto; } </style>
Click Save.
In the Assets directory, click theme.js. Add the following code to the bottom of the file:Copy$('.size-chart-open-popup').magnificPopup({ type:'inline', midClick: true });
Click Save.
Tip
If the size chart isn’t appearing, you might need to add extra code to your theme. Because Magnific Popup is required for this customization to work, some themes, such as Debut, require that you complete the following steps.
In the Assets directory, click to open your theme.scss.liquid file, or your timber.scss.liquid file, and add this css to the bottom.
Do one of the following:
If your theme has a vendor.js file in the Assets directory, open the file and add this code to the bottom.
If your theme does not have a vendor.js file in the Assets directory, place this code just above the $('.size-chart-open-popup').magnificPopup code in your theme.js file.
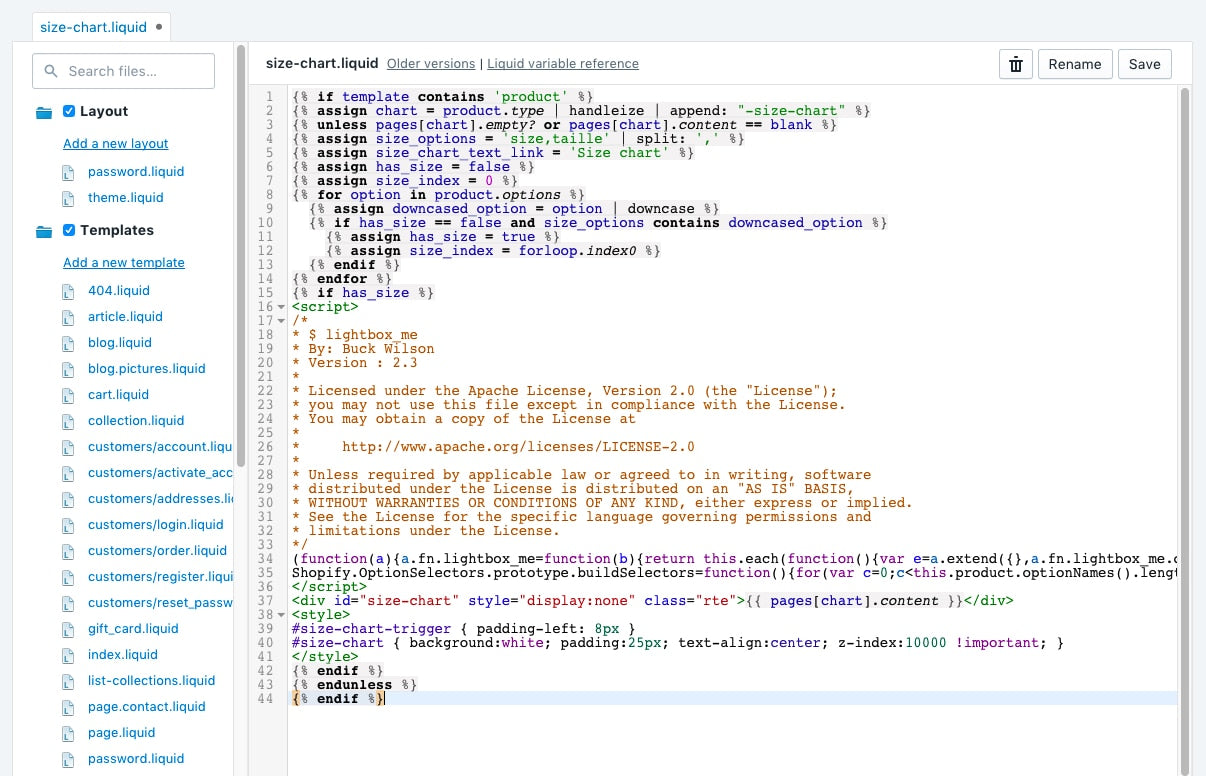
Return to your new size-chart.liquid snippet, and paste the code into the file:
Click Save.
In the Layout directory, click theme.liquid.
Find the closing </body> tag. Right before the closing </body> tag, paste the following code:Copy{% render 'size-chart' %}
Click Save.
Setting up a size chart specific to a vendor or product type
If you selected a size chart specific to a vendor or product type, you will need to make a size chart for each vendor or product type. The process is the same as making a chart for the whole shop, except you need to put the vendor or product type at the beginning of the size chart page title and handle. For example, if you have a vendor called Great Owls, your size chart page would be named Great Owls Size Chart, and the handle of the page would be great-owls-size-chart:
If your size chart is for a product type, you might have a chart for product type shoes. You would then call your size chart page Shoes Size Chart, and the handle would be shoes-size-chart .
Using a different language or changing the ‘Size chart’ text
If your store’s operating language is not English, or you want to use different text than ‘Size chart’ on your product page, you can make these changes in your size chart snippet.
Desktop
iPhone
Android
From your Shopify admin, go to Online Store > Themes.
Find the theme you want to edit, and then click Actions > Edit code.
In the Snippets directory, click size-chart.liquid.
Edit the size_options values to match the translation you have for your product option. Separate each option value with a comma.For example, to add a German translation, you might change the code to:{% assign size_options = 'size,taille,Größe' | split: ',' %}
Add a custom Mailchimp email campaign archive to your website and allow visitors to view your recent campaigns, which can improve visibility and your site’s SEO. Choose to embed our archive generator code, or design and host your own custom campaign archive for additional control. We’ll automatically update the links in the archive each time you send a campaign.
In this article, you’ll learn how to add a campaign archive to your website.
Before you start
Here are some things to know before you begin this process.
This is an advanced feature and is recommended for users familiar with custom coding. Contact us if you need assistance!
If you’re not comfortable with code, share your audience’s email campaign archive on the web to showcase your recent campaigns.
It may take up to 48 hours for your latest campaign to appear in your campaign archive.
This feature is compatible with both http:// and https:// sites.
— Where to Advertise your business for free or paid services in
GRANDE PRAIRIE, AB
Being in the media / web / technology industry in Grande Prairie, Alberta for the last decade. We have found the need to have an unbiased list for advertising your business in Grande Prairie. No Fluff, just the good stuff – specifications, locations maybe even pricing… everything you need in one place for your business!
We have taken multiple years to compile this list with valuable information such as government traffic data and potential website traffic stats etc.
Why? Personally made it easier for US… HAHA! We always want our clients to take advantage of anything within their reach! This map was created just so you can make the most informed decision for your marketing dollars. This is a live map and work in-progress… so comments are appreciated!
PLEASE NOTE: We have not been paid to promote any of these locations.
ADVERTISERS, We hope potentially you will see your referral traffic boosted from our website (MediaWizardStudios.ca) to YOURS 🙂 >> CLICK HERE FIND OUT HOW TO SEE REFERRAL LINKS IN YOUR OWN ANALYTICS<<
Digital Billboards are becoming a popular way to advertise. Cost to create graphics and change up your marketing on the fly is way more cost effective.
General campaign graphics can be used across digital marketing (Social, Google, Bing (SEM) etc.) Then cascaded on the big screens across the city in a few steps!
If you are looking to have some graphics created for your business no matter the medium – CONTACT US.
Need more information on City of GP Permits and signage regulations? CLICK HERE.
REILLY DIGITAL SIGNS
TWO (2) – 10’x20′ Outdoor Digital Billboards
Located on Highway 40 (South) Correction Line – Reilly Transfer Yard
SPECS: 7 second ads, 4 week flight Dimensions: 384w x 192h pixels. Format:PNG or JPG
DRIVER Advertising
STATIC + DIGITAL BILLBOARDS
SPECS: 7 second ads, 4 week flight Dimensions: 576w x 288h pixels. Format:PNG or JPG
The Grande Prairie & District Chamber of Commerce provides the exclusive opportunity for our Members to advertise on our digital sign. Located outside of Centre 2000 on 116 Avenue and 106 Street, this sign is stationed at one of the busiest intersections in Grande Prairie.
Digital billboards capture the attention of a wide range of different commuters. Capture their attention and reach a massive audience. With weekly, monthly, and yearly booking, we have options to meet all advertising budgets. Not-for-profit Member rates are also available.
For rate information, contract terms and design guidelines, please contact Leah Fujarczuk by phone at 780-532-5340 or email leah@gpchamber.com
In Alberta and Saskatchewan, we are extremely well distributed in Fine Dining establishments, Fast Food restaurants, Coffee Shops and places where people wait throughout the region. Coffee News® provides a few minutes of light reading while the order is taken and the meal is prepared. Since most patrons can read Coffee News® in about eight minutes, they have plenty of time to read all the ads as well. Coffee News® works!
GP Chamber Member Connections is issued on the 1st and 15th of every month and distributed by Constant Contact email to our membership and shared on our social media pages.
The Chamber Member Connections newsletter provides FREE advertising opportunities to our members – allowing them to promote their accomplishments, sales, and special events to the entire Grande Prairie & District Chamber of Commerce network and beyond.
Submissions: Chamber Members Only – must be limited to no more than 250 words, one logo and/or one .jpg, .pdf, or .png image, and should be emailed to tom@gpchamber.com no later than three business days prior to publication to allow for editing.
TEEPEE CREEK STAMPEDE PROGRAM
EVENT
— ADVERTISING THROUGH EVENTS & SPONSORSHIP
OPPORTUNITIES
Events are a great way to expose yourself to the local culture and really get to know how your real life audience interacts with your brand, product or business as a whole.
We have included some local events that have advertising opportunities or bundles with sponsorship.
COMMUNITY CONNECTIONS
Your connection to what’s happening in Grande Prairie!
Published: Quarterly
Community Connections contains details about programs for all ages, events and important information for residents of the City of Grande Prairie.
Ad Sizes: Quarter Page – 3.375” x 4.625” Half Page (Horizontal) – 7” X 4.625” Full Page – 7” X 9.5”
STORM PROGRAMS
STATIC + DIGITAL BILLBOARDS
SPECS: 7 second ads, 4 week flight Dimensions: 576w x 288h pixels. Format:PNG or JPG
TEEPEE CREEK STAMPEDE
This 100+ Year old event has its own program, multiple event centres and viewing areas to showcase your business visit tpstampede.ca for full details on how you can become apart of 4 DAY IN THE WILD!
Websites
— CROSS MARKET YOUR BUSINESS WITH LOCAL
ONLINE LISTINGS
Looking to cross promote your business on multiple websites? Some of these websites are free listings and some are paid.
Free/Non-Profit Community Billboard. Each Store will have to approve posters and events. Bring Tape or Magnets
BOOSTER JUICE - KATERI DRIVE
Free/Non-Profit Community Business Card Board. Bring a Push Pin
Black Framed Cork Board
DAIRY QUEEN SOUTHSIDE
Non-Profit Community Billboard just inside the front door. Bring Stapler or Push Pin
55A KAFFEE (INSIDE TEAL IDEAL)
Large Business Card Cork Board in front of till. Purchase your coffee or sweet treat & Bring Stapler or a Push Pin and good luck fitting your card in there somewhere 🙂
Reasons your site doesn’t rank — and how to fix poor rankings
A number of factors can influence your site’s Google rankings (or lack thereof).
Here are six reasons you might be wondering “why isn’t my website showing up on Google” and what you can do to fix it.
1. Your website isn’t indexed
Sites that aren’t indexed by Google won’t show up in search results — and there are several reasons your site isn’t being crawled and indexed by Google bots.
Your site is new
If your website is new, keep in mind that it can take several weeks for Google to index your site and reflect the changes in search results.
This is especially true for new websites since they don’t typically have many inbound links. Google considers both the number and quality of inbound links to sites when ranking them. It takes time to build up your domain authority, so don’t expect to see immediate rankings for a new website.
Your site has “no index” tags
If you have an older site that isn’t indexed, check your use of “no index” tags before searching “my website isn’t showing up on Google.”
Adding “no index” code to your site prevents search bots from crawling and indexing specific pages.
While there are some instances where you’d want to use “no index” tags, you’ll want to consult an SEO agency to make sure it’s done right and doesn’t prevent pages you want to rank from appearing in search results.
In addition, a robots.txt file can prevent Google crawlers from visiting entire portions of your site, so you’ll want to make sure you didn’t accidentally disallow pages you want to rank.
Websites that operate on WordPress have built-in features that instruct search engines not to index the sites. Owners need to disable the setting manually by visiting Settings >> Reading and unchecking the box next to Search Engine Visibility.
Wondering “how to index my site on Google”? Take a look at these tips
How to fix a non-indexed site
If your website isn’t indexed on Google, start by creating an account on Google Search Console.
This allows you to direct Google to your sitemap.xml and request it to crawl and index your URLs. It’s important to remember, though, that Google doesn’t guarantee site indexing, and if your site is new, it may still take time to rank in search engine results pages (SERPs). You can also update your site’s “no index” tags in your code and robots.txt to ensure Google bots can find, crawl, and index your pages.
2. Your website has a penalty
Penalties can also prevent your site from ranking in Google search results.
If your site doesn’t meet Google’s quality guidelines, it may temporarily or permanently remove your site from search results.
Google penalties include:
Deindexed: Google completely removes your domain from search results.
Penalized: Your domain still exists, but you can’t find your pages via direct search. This penalty may result from a Google algorithm update, or Google can manually apply it.
Sandboxed: Your Google traffic drops suddenly, but your domain wasn’t Deindexed or Penalized.
How to fix a Google penalty
Check Google Search Console for penalty alerts. If your site gets penalized, you’ll need to take steps to modify your website to meet Google’s guidelines. Then, you can submit your site for reconsideration to get back on Google.
3. Your website isn’t optimized for search
If you’re searching “my website doesn’t show up on Google,” you might need to beef up your SEO.
Search engines like Google consider hundreds of factors when rankings sites — and SEO helps you ensure your website’s optimized to rank at the top of SERPs.
SEO spans several strategies designed to boost your rankings and help you earn more conversions (and revenue) online. You can have the most beautifully designed site, but without SEO, it won’t rank in SERPs. Not to mention, nobody will be able to find and contact your business.
How to fix a website that isn’t optimized for search
Start by conducting a comprehensive SEO audit of your site. An SEO audit allows you to identify areas for improvement and make the necessary fixes to achieve top rankings.
When optimizing your site for search, here are a few things you’ll want to consider:
Clean up your site’s code and technical SEO
Ensure your site loads quickly
Streamline your website design and navigation to provide a positive user experience
Include target keywords in your site copy, headings, and page titles
Create in-depth, quality content that answers searchers’ questions
Depending on your time and resources, you may decide to spring for a custom SEO package.
4. Your website’s content sucks
Speaking of content, if your site copy sucks, there’s a good chance your site won’t show up in Google search results.
Search engines like Google want to rank sites that provide quality content that matches a searcher’s intent and satisfies their queries.
When creating content, aim to make it comprehensive enough that it fully answers searchers’ questions, so they don’t have to hit the back button to check out other results.
While you don’t need to create full-length guides to rank in SERPs, it’s essential to provide searchers with valuable content that keeps them engaged on your site — and encourages them to contact you to take the next step.
How to fix content that sucks
If your content leaves something to be desired, consider partnering with a full-service content marketing agency like WebFX to create custom site content. Our team understands how to create content that ranks in search results, and we’ll help you beef up existing pages to improve your position in the SERPs.
It’s also important to remember that search engines and users like fresh content, so keep yours updated regularly to achieve the best results.
5. Your keywords are too competitive
If you’re reading this post and thinking, “My content’s great and my website still isn’t showing up on Google,” then it’s time to revisit your keyword targeting.
Trying to rank for highly-competitive results, especially when competing with bigger brands, can sometimes leave your business in the dust. Instead, consider targeting long-tail, more specific phrases that contain three or more keywords.
While long-tail keywords have lower monthly search volumes, they are also less competitive, giving you a better chance of ranking at the top of search results. In addition, long-tail keywords typically have a more specific search intent.
For example, if someone searches a generic keyword like, “tent,” it’s hard to determine exactly what they want to find.
Do they want to know how to set up a tent? Are they researching the best tent for their next camping trip? Do they want to buy a specific type of tent?
On the other hand, if someone searches the long-tail phrase, “buy two-person backpacking tent,” you know that they’re ready to purchase.
Companies that sell outdoor gear will have an easier time ranking for the long-tail phrase “buy two-person backpacking tent,” and they can create content that matches that specific intent.
How to fix an overly ambitious keyword strategy
Successful SEO campaigns always start with keyword research.
Using tools like Keyword Tool, Ubersuggest, and Google’s Keyword Planner, try to identify long-tail keywords with less competition that offer the most value to your business. Targeting less competitive phrases will allow you to show up in Google results and reach more customers online.
6. Your site doesn’t provide a good user experience (UX)
Finally, if your website delivers a poor user experience (UX), you can kiss top rankings goodbye.
Search engines want to rank valuable content and websites that provide visitors with a great experience. If users don’t have a positive experience on your website, they’ll waste no time hitting the back button — a signal to Google that your site shouldn’t rank.
Improving UX on your site can reduce bounce rates, engage visitors, and help them learn more about your business, all while helping you rank higher in search results.
How to fix a poor UX on your website
A few quick fixes can take your UX and site rankings to new heights. To improve your site’s UX, you can:
Speed up your site’s load time with page speed optimization services
Streamline your site’s navigation to make it easy to find information
Include visual elements to break up content and engage visitors
For more info on improving your site’s UX, check out our user experience analysis services.
Take charge of your rankings with SEO services from WebFX
WebFX offers custom SEO services to help your business rank at the top of search results and earn more revenue online.
We’ll audit your SEO strategy to determine why your site isn’t showing up on Google and help you implement solutions that drive results — and prevent you from searching “my website isn’t showing up on Google.”
Want to learn more? Contact us online or give us a ring at 888-601-5359 for a free SEO quote!
To add your business information to Google Maps, Search, and other Google properties, create a Business Profile on Google (or get access to one, if it exists). Use Google My Business for free to manage how your business information appears across Google, including Search and Maps.
Sign in to your Google Account, or create one. Then, click Next.
Sign up with your business email domain since this account will be for your chain. Enter the name of your business or chain. You can also select your chain from the suggestions that appear as you type (if applicable).
Enter your business’ or chain’s address. You may also be asked to position a marker on the location of your chain’s branch on a map. If your business doesn’t have a physical location but works in a service area, you can list the area instead. Then, click Next.
Choose if you want your business location to appear on Google Maps.
At the bottom, click I deliver goods and services to my customers Next.
List your service areas, then click Next.
Search for and select a business category. You can also choose a more specific category as appropriate. Then, click Next.
Enter a phone number or website URL for your chain, and click Finish. Tip: You’ll also have the option to create a free website based on your information. It’s recommended that you provide the individual phone number or store page for each location, rather than a single centralized call center.
Select a verification option.
To verify later, click Verify laterLater. If you’re not authorized to manage the Business Profile for the chain, find the person in your organization who’s authorized and continue the process.
Tip: If you see a page that says “This listing has already been claimed,” click Request access. Then, follow the directions to claim your business. Learn more about how to request ownership.